It is not enough to choose a shade and just snap the veneers in place on the front of the teeth; a patient wants to have a brighter, more even smile. Do teeth need to be prepared or not? Which of these veneer materials would be more suitable? Will veneers cover up discoloration, gaps, and minor misalignments without looking too large and bulky? Here are some points to take into account.
This guide will walk you through the essentials of dental veneers, such as the different types of veneers, the materials used for their construction, methods of preparation, shade considerations, manufacturing process, and primary indications for their use.
At the end of the period, you will be familiar with the relative merits of veneer types and materials, and when to consider conventional, minimal prep, or no-prep veneers, as well as when veneers are appropriate.
1. What Are Veneers?
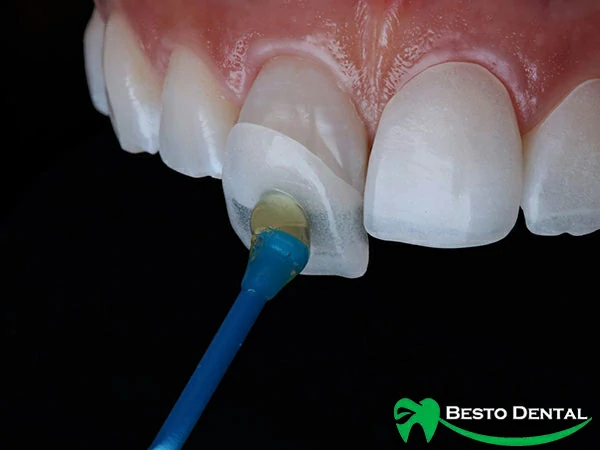
Veneers are thin shells, custom-made to fit over the front of natural teeth to enhance the look, shape, proportion, size, and color. They are generally constructed from dental ceramics like porcelain or lithium disilicate and are intended to be used over the visible facial surface of the tooth only, not to replace all the components of the tooth.
A veneer is used to cover areas of the tooth that are only visible in the smile line, as opposed to the whole of the prepared tooth as in a dental crown. In some instances, a small amount of enamel is removed, and in other cases, the dentist will use a minimal preparation approach and bond the veneer directly to the tooth. The natural tooth is left intact, and the veneer creates a new visible surface to correct multiple aesthetic issues simultaneously.
The advantages of dental veneers are:
- Natural appearance: Dental ceramics can reproduce the shade, translucency, contour, and surface characteristics of natural enamel and help the veneer blend with surrounding teeth.
- Less tooth preparation: Veneers typically require less of the tooth to be reduced as they only cover the front of the tooth.
- Several aesthetic corrections: One veneer may enhance more than one aspect of the tooth, such as colour, shape, length, proportion, and minor surface irregularities.
- Resists external staining: Ceramic veneers will not stain as easily as natural enamel and resin-based restorative materials, thus preserving the look of the veneers over time.
- Individual smile design: All veneers can be made to fit the patient’s current teeth, the facial proportions, the position of the tooth, and the smile that the patient wants.
- Retention of more of the natural tooth structure: Treatment is primarily on the visible surface, so there is a greater possibility of preserving more of the natural tooth structure than there would be with a full coverage restoration.
Veneers are generally applied to the front teeth that are in view, especially the incisors, canines, and sometimes the premolars. They may be advised for teeth that have persistent discoloration, worn or chipped edges of incisal teeth, irregular shapes, small gaps between teeth, undersized teeth, or minor aesthetic alignment issues. For instance, veneers can close a gap between the front teeth, lengthen a short front tooth, even out the size of short lateral incisors, and can give a more uniform texture and color in the smile. They are mostly a cosmetic treatment, and if there is significant structural damage, large bite issues, or any other conditions that necessitate a stronger treatment method, other treatment choices may be more appropriate.
Tooth preparation and shade are two important considerations with veneers, and we’ll take a closer look at both in the sections below.
2. Types of Veneers
Dental veneers can be classified in different ways: by the material they are made from, by how the teeth are prepared, and even by the decorative elements added to them.
Over more than a decade of working with dental clients, BestoDental has seen many different types of veneers, along with some less common custom requests. Let’s go through the main types we commonly come across in real cases.
1) By Material
At BestoDental, we handle veneer cases made from different materials. Based on the cases we commonly work with, veneer materials can generally be divided into the following three categories:
1. Porcelain / Ceramic Veneers
A wide variety of ceramics are used for porcelain veneers. They can be used as Lithium Disilicate Veneers (the most popular being the e.max veneers) and Feldspathic Porcelain Veneers which are less popular.
2. Composite Resin Veneers
There are two types of Composite Resin Veneers: Direct Composite Veneer and Indirect Composite Veneer.
Direct Composite Veneers are built up and shaped directly in the patient’s mouth by the dentist using composite resin. Indirect Composite Veneers are made outside the mouth or in a dental laboratory and then bonded to the teeth.
3. Zirconia Veneers
One of the more durable materials for Zirconia Veneers is the material’s strength. Zirconia is not as translucent as one might expect for veneers, however, and Zirconia veneers are not as common.
| Material | Main Characteristics |
| Porcelain / Ceramic Veneers | The most common type of indirect veneer. They have good esthetics and colour stability and can be subdivided based on the ceramic material used. |
| Composite Veneers | Made from composite resin. They can be created directly in the patient’s mouth or made indirectly outside the mouth. |
| Zirconia Veneers | Higher in strength, but different from glass ceramics in translucency and bonding. They are a relatively less common choice for veneers. |
The most common applications for zirconia remain dental crowns and bridges; if you would also like to learn about outsourcing zirconia work, please check out our other guide: Zirconia Dental Lab Outsourcing Guide: Price, Workflow & Lab Selection.
2) By Tooth Preparation
Not all veneers require the same amount of tooth structure to be removed. Based on the preparation approach, veneers can generally be divided into Conventional Veneers, Minimal-Prep Veneers, and No-Prep Veneers.
| Type | Tooth Preparation | Main Feature | What to Keep in Mind |
| Conventional Veneers | A certain amount of enamel is removed | Creates more space for the veneer and gives more control over the final shape and shade | Once enamel is removed, that natural tooth structure cannot be restored |
| Minimal-Prep Veneers | Only a small amount of tooth structure is removed | Preserves more natural tooth structure while still creating enough space for the veneer | The amount of preparation still depends on the original tooth position and the final design |
| No-Prep Veneers | Little to no tooth preparation | Preserves as much natural tooth structure as possible | Not suitable for every case; if the original teeth are already prominent, adding veneers may make them look too bulky |
Many of our clients ask for no-prep veneers. This process will depend on the original tooth position and tooth shape, and the available space for the end veneers. Before production, if our technicians find that a case is not suitable for a no-prep design, we will let the client know and discuss the issue before moving forward.
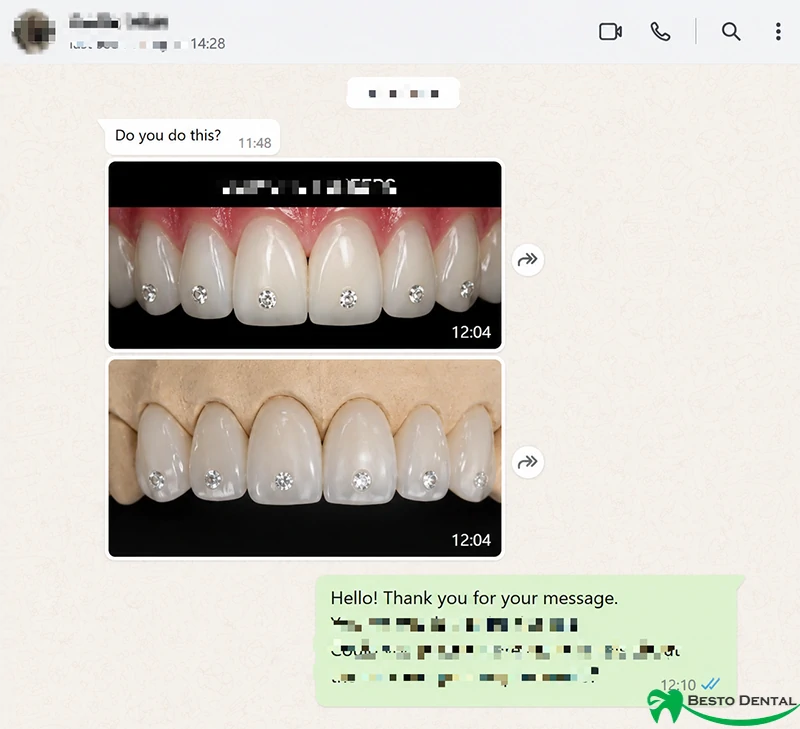
Besides regular veneers, we occasionally receive some more unusual custom requests, such as Diamond Veneers. These are based on a regular veneer design, with diamonds or other decorative elements added at specific positions as part of a more personalized aesthetic design.
3. Shade for Dental Veneers
The shade of veneers directly affects how natural the restorations look once they are seated in the patient’s mouth. Besides choosing the right shade, communicating the shade information accurately to the laboratory is just as important.
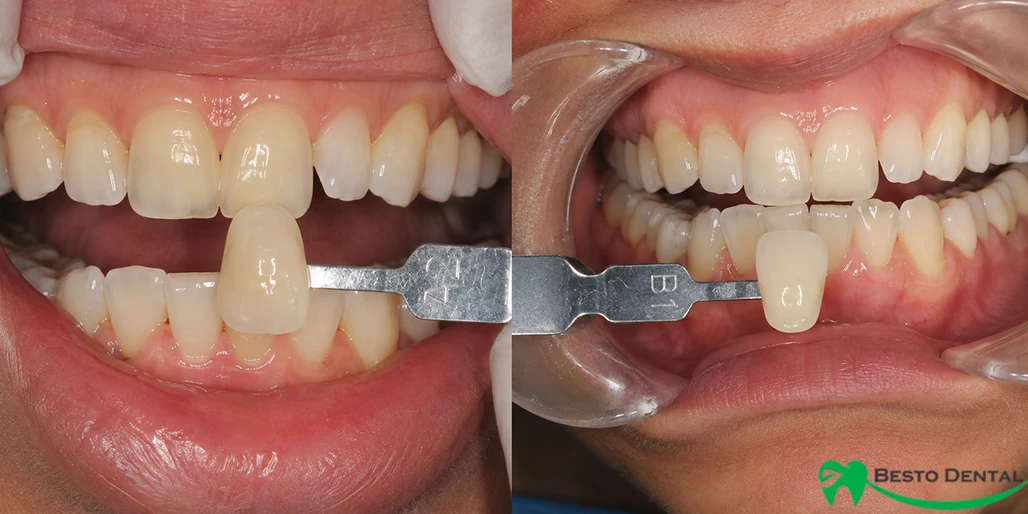
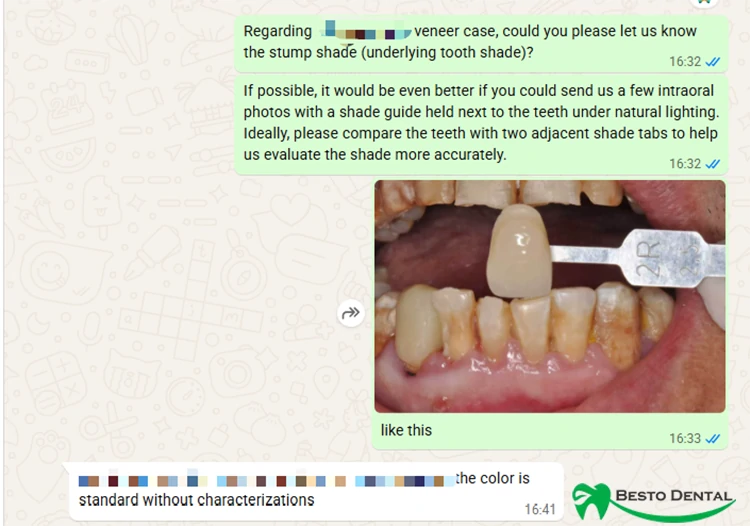
We had a veneer case where the shade provided did not accurately match the patient’s actual intraoral color. Consequently, as the veneers were seated there was a lack of congruence with the surrounding teeth. After that, we adjusted the way we take shade references and record shade photos:
When taking the shade, place the shade tab in the patient’s mouth and compare it with the target tooth and adjacent teeth. If possible, take photos with several similar shade tabs for comparison. We recommend taking the photos in natural light without using flash, and sending them to the laboratory together with the case information.
This way, the technician does not have to rely only on the shade written on the case form. They can also refer to the patient’s actual intraoral color, the adjacent teeth, and the differences between several similar shades.
4. Manufacturing Process of Veneers
We handle a large number of veneer cases every day and have extensive experience with this process. Below, we’ll walk through the complete manufacturing process of dental veneers.
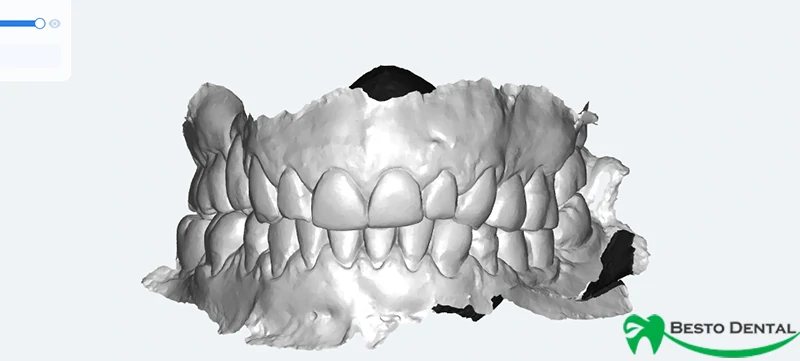
1) Receiving the Model or Digital Scan
Just like other dental cases, veneer cases also require the patient’s intraoral scan data. You can send digital cases or physical models.
2) Designing the Veneer Shape
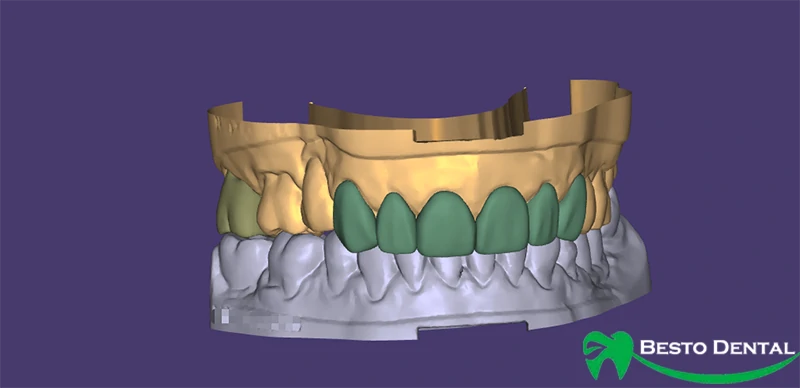
The tech then creates the veneers according to the patient’s tooth structure, bite and dentist’s needs. Should the client have any particular requirements then the design can be sent for approval prior to fabrication.
3) Fabricating the Veneers
Once the design is completed, the veneers can be fabricated according to the selected material.
4) Finishing the Shade and Surface Details
Once the outline of the veneers is finished, the technician will finish working on the shade, translucency, and surface texture of the veneers.
Natural teeth are not a single, uniform white color. This is especially true for anterior teeth. Translucency of incisal region, color difference in regions and subtle surface textures all can make a difference in the natural appearance of veneers after placement.
Finally, after staining, glazing, polishing, and other finishing procedures, the veneers become the final restorations.
5) Final Check
The completed veneers are then checked for margins, contacts, shape, occlusion, shade, and other details. Once everything has been checked and no obvious issues are found, the restorations are ready for delivery.
| Manufacturing Stage | What We Do | What to Keep in Mind |
| 1. Scan / Model | Obtain accurate data of the patient’s teeth, adjacent teeth, and occlusion | Veneers are very thin, so details such as preparation margins and contact areas need to be recorded clearly |
| 2. Veneer Design | Design the length, width, shape, and incisal position of the veneers | For multiple anterior veneers, we need to look beyond each tooth and consider the overall proportions and harmony |
| 3. Fabrication | Fabricate the veneers according to the selected material | Different materials require different fabrication methods, such as CAD/CAM milling, pressing, or porcelain layering |
| 4. Shade & Surface Finishing | Adjust the shade, translucency, and surface texture, followed by glazing and polishing | Natural teeth are not uniformly white, so color variations and surface details also need to be reproduced |
| 5. Final Check | Check the margins, contacts, shape, occlusion, and shade | Make sure the restorations meet the design requirements before delivery |
5. Clinical Indications of Veneers
We all know the most common place for veneers to be placed is in the anterior region. Some of the more prevalent indications for veneers are summarized below:
| Common Situation | What Veneers Can Improve | What to Keep in Mind |
| Tooth Discoloration | Mask discoloration that is difficult to improve with whitening and help achieve the target shade | Severely discolored underlying teeth may show through the veneers, so the material’s translucency, masking ability, and underlying tooth color need to be considered |
| Unsatisfactory Tooth Shape or Size | Improve teeth that are too small, too short, or uneven in shape, creating better proportions in the anterior region | The adjacent teeth and overall smile design should be considered rather than looking at a single tooth alone |
| Anterior Gaps | Close small spaces by increasing tooth width, such as in some diastema cases | If the gap is too large, simply making the veneers wider may result in unnatural tooth proportions |
| Minor Chips, Wear, or Incisal Damage | Restore the missing shape of anterior teeth while improving their appearance | If a large amount of tooth structure is missing, veneers may not provide enough coverage for the restoration |
| Minor Alignment or Position Issues | Change the outer contour of the teeth to make mildly rotated, recessed, or uneven teeth look straighter | Veneers cannot actually move the teeth. For significant misalignment, orthodontic treatment should usually be considered first |
| Overall Aesthetic Improvement of Multiple Anterior Teeth | Adjust the color, length, shape, and proportions of several anterior teeth at the same time | Multiple teeth should be designed as a whole rather than treating each tooth separately |
Regarding this, there’s one thing that can go wrong. Absolutely, veneers can correct a slightly crooked smile. If there is a slight recession in a tooth, for example, an additional facial contour can improve the look of the tooth. Even slight variations in a tooth’s shape can be fixed with veneers. However, veneers change the outer shape of the teeth, not their actual position.
If the teeth are significantly crowded, rotated, or out of position, trying to make them “look straight” with veneers may require removing too much natural tooth structure or making certain areas of the veneers too thick. In these cases, orthodontic treatment, or a combination of orthodontic and restorative treatment, may be a more appropriate option. If you would like to learn about orthodontic outsourcing, the guide Orthodontics Dental Lab Outsourcing Guide: Price, Workflow & Lab Selection might be helpful to you.
6. Dental Veneers FAQs
Veneers are a frequently discussed restorative option among our clients. We have compiled the following FAQ section to address some of the frequently asked questions and provide accurate information and useful tips on the subjects.
1) How long do dental veneers last?
Although not permanent, ceramic veneers can last a long time if appropriate, when bonded and maintained properly. The length of the time they persist can be affected by the kind of veneer, bonding technique, occlusion, oral hygiene, grinding or biting hard objects.
2) Can veneers fall off?
Yes, veneers can come off, though this is typically not the case with a well-designed, well-bonded restoration. Bonding to enamel generally offers a predictable support for veneers. Debonding is more likely to happen when there is insufficient enamel, contamination during bonding, and/or huge occlusal forces or poor case selection.
3) Can veneers be repaired if they chip or crack?
This is based on the severity of the damage. It is sometimes possible to repair a small chip intraorally with composite resin and a larger fracture may call for a replacement of the veneer. The material used and the location of the fracture will also affect the repair options.
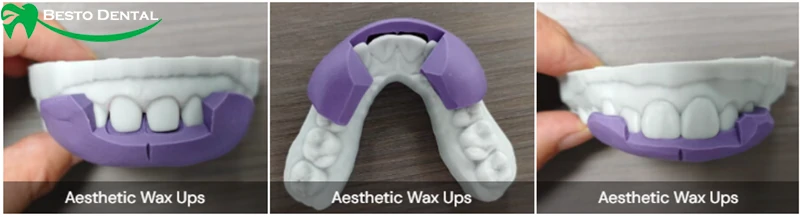
4) What is a wax-up for dental veneers?
A wax-up is basically a prototype of a planned veneer design prior to the production of the final restorations. The wax-up can also be placed into the patient’s mouth as a mock-up, so that the dentist and patient can visualize the treatments they are planning before proceeding to the actual veneers.
Before making the final restorations, BestoDental can wax-up and make an assessment of the desired result.
5) Why does the laboratory need a stump shade for some veneer cases?
The veneers are thin and the color of the tooth can be seen through the veneer. This is particularly critical where the prepared tooth is rather stained, or where a highly translucent ceramic is to be used.
A stump shade gives the technician a better idea of the color underneath the restoration, helping them select the appropriate translucency and masking strategy to achieve the target final shade.
This is also part of our case review process at BestoDental. If the stump shade is important for a veneer case but is not included in the case information, we will contact the client to confirm it before moving forward.
6) Can veneers close gaps between teeth?
Yes, veneers can be used to close some small spaces by changing the width and contour of the teeth. However, there is a limit. If a large gap is closed simply by making the adjacent teeth wider, the final tooth proportions may look unnatural.
This is why the size of the gap and the proportions of the surrounding teeth need to be considered together.
7. Conclusion
Dental veneers may look like very thin restorations, but making them look natural, balanced, and meet the patient’s expectations involves much more than simply choosing a material and a shade. The preparation approach, material selection, stump shade, shade communication, veneer design, and whether the case itself is suitable for veneers can all affect the final result.
If you are working on a veneer case, you can also send your digital case files to BestoDental. Our technical team will review the case before production and confirm any design or fabrication details that need attention based on the actual case.